
If you love the home decor show Trading Spaces, consider this an opportunity to decorate a room for someone else, just on a smaller scale! As most of you know, I love to come up with up-cycled Barbie Doll furniture from Thrift Store or garage sale finds, even stuff you might consider throwing away can be transformed into something new. I also like to incorporate great finds from the Dollar Tree for parts and embellishments.
I’m partial to bright colors and the ‘Feeling Groovy’ theme is certainly that! My goal is to share ideas and inspirations, and encourage kids and parents alike to get creative, reuse and have some fun. You might not find the exact same pieces, but you’ll see how easy it is and hopefully get inspired to go on a treasure hunt of your own! There is no sewing and no tools so this is something kids can do too. Here are few Feeling Groovy ideas on how to turn something old into something new for your Barbie Doll.

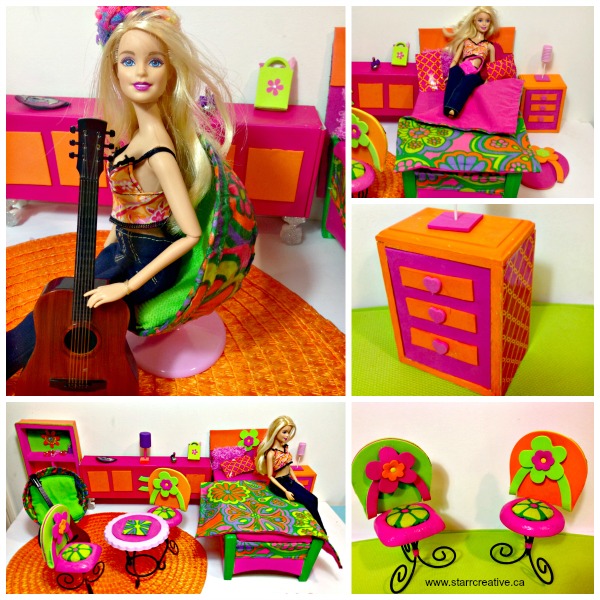
Flip-Flop Chairs
Lets start with the flip-flop chairs. These chairs were originally tea light holders. I found these flip-flop wine coasters at the Thrift Store (I have since seen them in the Dollar Tree) They are foam and easy to cut. I just glued them to the metal heart-shaped back with tacky glue. I covered a round piece of foam for cushions and glued on fabric from my 1960/70’s apron before inserting and gluing them into where the tea-light would normally go.


Table
The little table is a metal candle holder from the Thrift shop. I put
the top of an individual cupcake holder from the Dollar Tree.
store as a table cover but you could use a jar lid.

Groovy Chair

This chair was made with a super-sized Slurpee lid. I adhered fabric to the lid using Modpodge and then inserted a soft scrub cushion from the Dollar Tree. For the base I used the stand from the individual cupcake holder from Dollar Tree and wrapped a piece of foam curler around it to give it more stability and more space to glue the Slurpee lid to. It’s weirdly solid, I was actually a bit surprised.


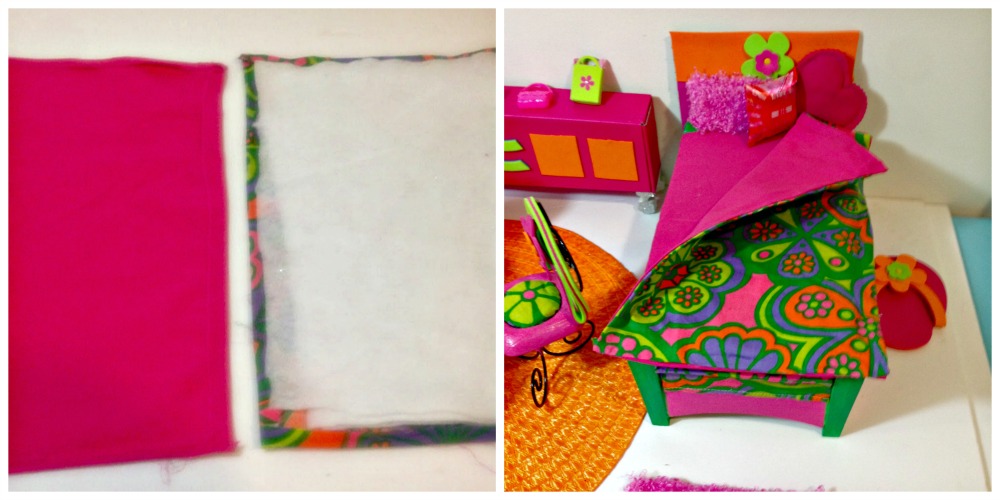
The Bed.

I found a wooden box and a 1960/70’s apron at the Thrift Store. I painted the sides and posts with craft paint and Modpodge gloss for a more durable coating on top, and then covered a piece of foam in some fabric using tacky glue. I glued on some strips from the apron ties for edging on the bed side and foot board. For the head-board, I adhered colored craft foam from the Dollar Tree. to cardboard, added a sticker and glued it to the bed.

Easy No-Sew Comforter
I cut out two fabric rectangles, one pink and one from the patterned apron fabric so I had a reversible comforter. I pressed down a 1/4 folded seam around the edges of each. I laid both pieces good side down with the folded in edges up. Next, I put some batting (you could leave out) down on one piece leaving the folded edges exposed. Finally, I added tacky glue around the edges and glued both pieces together. It worked perfect! The trick is to use a minimal amount of glue applied evenly along the full length and width of the edges (use a toothpick or small paint brush) and in the corners. Press together, moving your fingers around the entire rectangle. You’ll see in the pictures below of the bedding that it looks just like a finished, sewn blanket. Kids can do this and use their favorite clothes they’ve out grown and re-purpose them into blankets and pillows.
Of course, if you sew – go for it! I’m trying to include option so that anyone can make the comforter without needing a sewing machine but if you have it by all means use it or it’s a great opportunity to teach your child how to hand stitch with a needle and thread.
Bedside Table
This is my favorite piece in this collection. It is a wooden drawer from a child’s jewellery box. I’ve painted it orange using a paint pen but you could use craft paint as well, and added a piece of patterned Duck brand duct tape to the sides. On the bottom of the drawer (which is now the front of the bedside table) I’ve applied a piece of pink sticky back craft foam and orange drawers. The little foam hearts were part of a mixed foam shape package from the Dollar Tree craft section.

Shag Rug
I added a few rugs to this scene. The large orange circular one is a place mat from the Dollar Tree, I also used one of the flip-flop wine coasters as a bedside mat (see pic above) and my favorite – this pink shag throw rug!
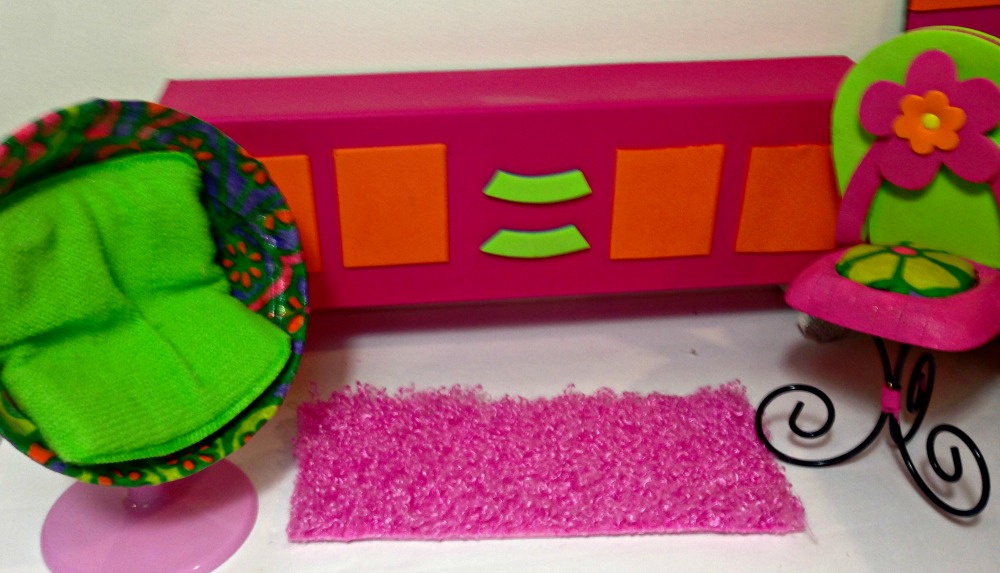
This easy to make rug originates from a pink, fuzzy, pencil case. I got this in a bin at the reuse center and it was brand new with original price tag still on it, but I’ve seen them at the dollar stores as well. I cut out a rectangle section from the pencil case and an equal sized rectangle from a pink piece of sticky back craft foam then applied it to the back of the rug.

Reversible Cabinet
Some of you might remember this reversible cabinet I made from a previous blog Easy DIY Reversible Barbie Furniture. This
is just a pink box that I added toe separators (for when you’re
painting toe nails, available at Dollar Tree) as legs and used Duck brand
duct tape and sticky back craft foam for cupboard the cupboard doors. I got
lucky finding a pink box but you could wrap a box in wrapping paper as well.

I think Barbie is definitely ‘Feeling Groovy’ and settled into the new pad!
I hope I’ve inspired you to spend a little time with or for your Barbie enthusiast and give this a try. Visit my other DIY Barbie Projects for more ideas that will help inspire you to look at old things in and new way.
Let the inner-child in you out and play a little. If you have a child that plays with Barbies, dig through the recycle box or those things packed up to go in your garage sale and see what you can find and then encourage your child to give it a try or join in and see what you both come up with. If your Barbie enthusiast is all grown up, then just make them for the joy of it or for gifts.
Warning: Addicting – you will never experience a garage sale the same way, you will be looking at what you can turn everything into instead of what it presently is. lol
Check out more of my Thrift Store finds turned into Barbie Treasures The following are just a few examples of how to turn something old into something new and watch my video on Easy No Sew Pillows

If you’re wanting to make Barbie clothes you’ll want to visit Chelley Wood where you will find a huge amount of free printable patterns for dolls of all sizes. It’s an amazing site, one of my favorites, so check it out! Click on pics below to view.


I love this! I have done some repurposing for my daughter’s Barbies as well. My favorite is a sofa I created out of a plastic baby wipes container, some cardboard, and zebra patterned felt. I recovered my 1980s Dream House chair with zebra felt to match.
Dollar Tree has some great stuff sometimes! I found some unfinished wooden doll furniture there, which I let my daughter paint and she loved it 🙂
A few years ago I made a neat 60s patterned bean bag chair out of fabric scraps and some lentils (for filling) for my niece and some chairs from flooring samples from Home Depot.
It is so much fun making something from nothing or repurposing old items 🙂 I’m glad I have a daughter and nieces so I can still have fun creating for Barbie!
LikeLike
you are most welcome!
LikeLiked by 1 person
Thank you so much!!!
LikeLiked by 2 people
superb! Amazing photos!
LikeLiked by 2 people
lol I know right! I feel like I’m walking around looking through a whole different lens! Your wonderful patterns are a great pairing. Hopefully we can connect on other projects in the future.
LikeLiked by 1 person
You wrote: “you will never experience a garage sale the same way, you will be looking at what you can turn everything into instead of what it presently is.” SO TRUE! I have this exact same problem. I miss all the big stuff at yard sales because I’m so busy looking for miniature-makes!
And thank you for the mention. That was very kind of you! 💖
LikeLiked by 2 people
How great is that!!
LikeLiked by 1 person
Love these! My mother in law made my daughter and granddaughter tons pf clothes. My granddaughter is 8 and playing with her moms Barbie’s!
LikeLiked by 2 people
Great to find you. I was so sad when I thought you stopped blogging!!!
LikeLike
Thank you for talking back at me on my new blog, I sent you for sure one message but I don’t know if you got it. I haven’t completely figured out the commenting thing on Blogger yet. And I tried to find your blog on there and haven’t tracked it down yet. I hope you have a GREAT DAY and an AWESOME WEEKEND!!!!!
LikeLiked by 2 people
I’m so happy I found you still blogging – new location I see. Looking forward to all your wonderful blogs on new site!
LikeLike
Thank you!
LikeLike
VERY CLEVER and SUPER NICE!!!!!!!!
LikeLiked by 1 person
Thanks for the reblog. I’m really enjoying your blog!
LikeLiked by 1 person
Thanks so much – it makes me really happy to hear the projects take you back! I only have grandsons and they think what I do is cool but they aren’t really interested lol I did however make some GI Joe things for them back in the day – I should see if I have pictures. I love groovy fabric too – just hunting for it is exciting – way funner than fishing lol
LikeLike
Thank you!!!!
LikeLike
Thanks so much!
LikeLike
This is absolutely adorable–and I love that it’s great for kids too. Very Clever!
LikeLiked by 1 person
Too dang cute! You are truly creative!
LikeLiked by 1 person
I love visiting your barbie posts, they take me back to being a little girl. You are so creative to think of using the tealite holders as backings for chairs. How fun is your house, I bet the kids just love visiting you. I also like those bright colors of vintage fabrics. I will be going on a vintage fabric hunt up north for my July birthday coming up. I love shopping for groovy fabric. Thanks Starr, this was a fun post to see and read.
LikeLiked by 1 person
Thank you so much for comments and reblog!!! It was a fun project.
LikeLiked by 1 person
Thank you!!
LikeLiked by 1 person
That’s so creative!!! I love the things you have made and would never have guessed that they are made from other things! Xxx
LikeLiked by 1 person
Reblogged this on The Vintage Toy Advertiser and commented:
Just fab! So creative, colourful and groovy. I have an 80s Barbie but this makes me want to go out and find a 70s Barbie now 🙂
LikeLiked by 1 person