DIY BARBIE ACCESSORIES, View All

DIY Barbie Doll Hotel Room

Trash To Treasure Barbie Fireplace DIY Barbie Doll Hotel Trash to Treasure #barbiedoll #furniture #upcycle #hotel #fireplace #bed #TV #diorama #repurpose #DIY #Thriftstore #trashtotreasure DIY Up-Cycled Barbie Doll Float Tube
08/22/2018 StarrcreativeEdit "DIY Up-Cycled Barbie Doll Float Tube"	

featured-picture.jpg

The Inspiration
One garage sale and one Styrofoam craft ring in a surprise bag and my inspiration struck. We love floating on tubes at the lake so why shouldn’t Barbie! I  likes projects that are reasonably simple and fast to make and this project fits the bill. I would give it a medium level of difficulty and suggest parents do this project along with their little Barbie enthusiast.

Whenever possible I try to make my projects from recycled or salvage things or I up-cycle, restore or re-use found items. I  like the idea of inspiring others  to turn something old into something new!

Barbie Doll DIY Float Tube Make form Old Swim Trunks. #barbieaccessories #barbiedoll #rivertube #floattube #handmade #toys #swimtrunks Beach #beachtoys #DIY #recycle #repurpose #upcycle

Getting Started
Once I had the Styrofoam ring and the inspiration I got to digging through fabric and couldn’t find anything that worked  so I checked the bag of  clothes I’d set aside to give away and there they were – my grandsons old swim trunks!

DIY Barbie Doll Float Tube for River or Lake Made from Swim Trunks #barbiedoll #barbieaccessories #craft #toy #handmade #DIY #nosew #reuse #floattube #upcycled #beachvacation #dollThese swim trunks were perfect with lots of color and patterns, netting inside and 4 grommets at the waist. The shorts I used were men’s small. If you don’t have any call your friends with growing kids or check your local Thrift shop.

The first thing I did was cut out a piece of one leg large enough that I could wrap it around the ring. I used a paint brush to apply tacky glue to the ring then placed the fabric on top of the ring and slowly worked the fabric around the ring until it came together at the bottom . I cut off any excess fabric and secured it  with glue.
Use stick pins to hold until glue sets. This can be a bit tricky – an option is to cut fabric in 2″ strips and wrap it around but makes it harder to get the pattern you want to display.

A bottom is optional but I chose to cover two cardboard circles in fabric and glue them together good sides out and then glued it to the bottom of the tube to cover where the fabric was gathered and bunched underneath.

DIY Barbie Doll Float Tube for River or Lake Made from Swim Trunks #barbiedoll #floattube #accesories #upcycled #DIY #toys #beach

Now it was time for some detailing! I needed handles, and grommets with wrap around cord and a back rest. The shorts had 4 grommets for the tie up cord. I cut them into 4 equal pieces then glued them evenly around the tube with tacky glue. Again use stick pins to hold glued pieces down until they dry. The shorts came with a white cord but I opted to use a black shoe lace instead – a bit thinner and easier to work with.

double grommet pictures DIY Barbie Doll Float Tube for River or Lake Made from Swim Trunks #barbiedoll #floattube #accesories #upcycled #DIY #toys #beach

Now what to do about the handles? I’m one of those craft people who has endless supplies of odds and ends that I collect along the way. I found a little package of corded loops that I had picked up at the City of Edmonton Reuse Centre years ago – finally a purpose! I just glued them to each side and ta-da… perfect handles! It’s unlikely you’ll have this exact same thing just lying around your house but dig through the junk drawers and see what you can come up with – that’s what makes it so fun, there is no one way – it’s all about imagination and turning something old into something new.

float tube handles DIY Barbie Doll Float Tube for River or Lake Made from Swim Trunks #barbiedoll #floattube #accesories #upcycled #DIY #toys #beach

Two more steps and you’re done! Next you add the netting. If the shorts you have don’t have a netting lining inside dig around and see if you can find something that does – an old back pack pocket, or tattered gym bag maybe? You want to have enough netting that you can cut a large enough circle to fit inside. Glue along the inner edge leaving enough netting to hang down so Barbie can sit into the tube. My netting had a nice trim but it only went half way around so I used some electric tape over the raw edges of the remaining glued netting just to make it look tidy and more realistic.

Netting seat float tube handles DIY Barbie Doll Float Tube for River or Lake Made from Swim Trunks #barbiedoll #floattube #accesories #upcycled #DIY #toys #beach

And now you’re ready to add the back-rest! Once again I dug through my supplies for something that might work and discovered a  package of flexible foam curlers from the Dollar Tree. They are like miniature pool noodles. They were a little too long so I removed the wire that is inside and cut them to the length (about 4″) I tried stacking and gluing them with tacky glue but it wouldn’t hold so I used Gorilla clear glue (not a great idea to let kids use this so supervision is required)  An option might be foam glue or maybe even a glue gun. Again – use stick pins to hold in place until it drys. If you don’t have flexible foam curlers get creative and try something else, maybe cover a piece of corrugated cardboard in left over swim trunk fabric or color the cardboard with markers?

Foam Back Rest float tube handles DIY Barbie Doll Float Tube for River or Lake Made from Swim Trunks #barbiedoll #floattube #accesories #upcycled #DIY #toys #beach #Starrcreative.ca

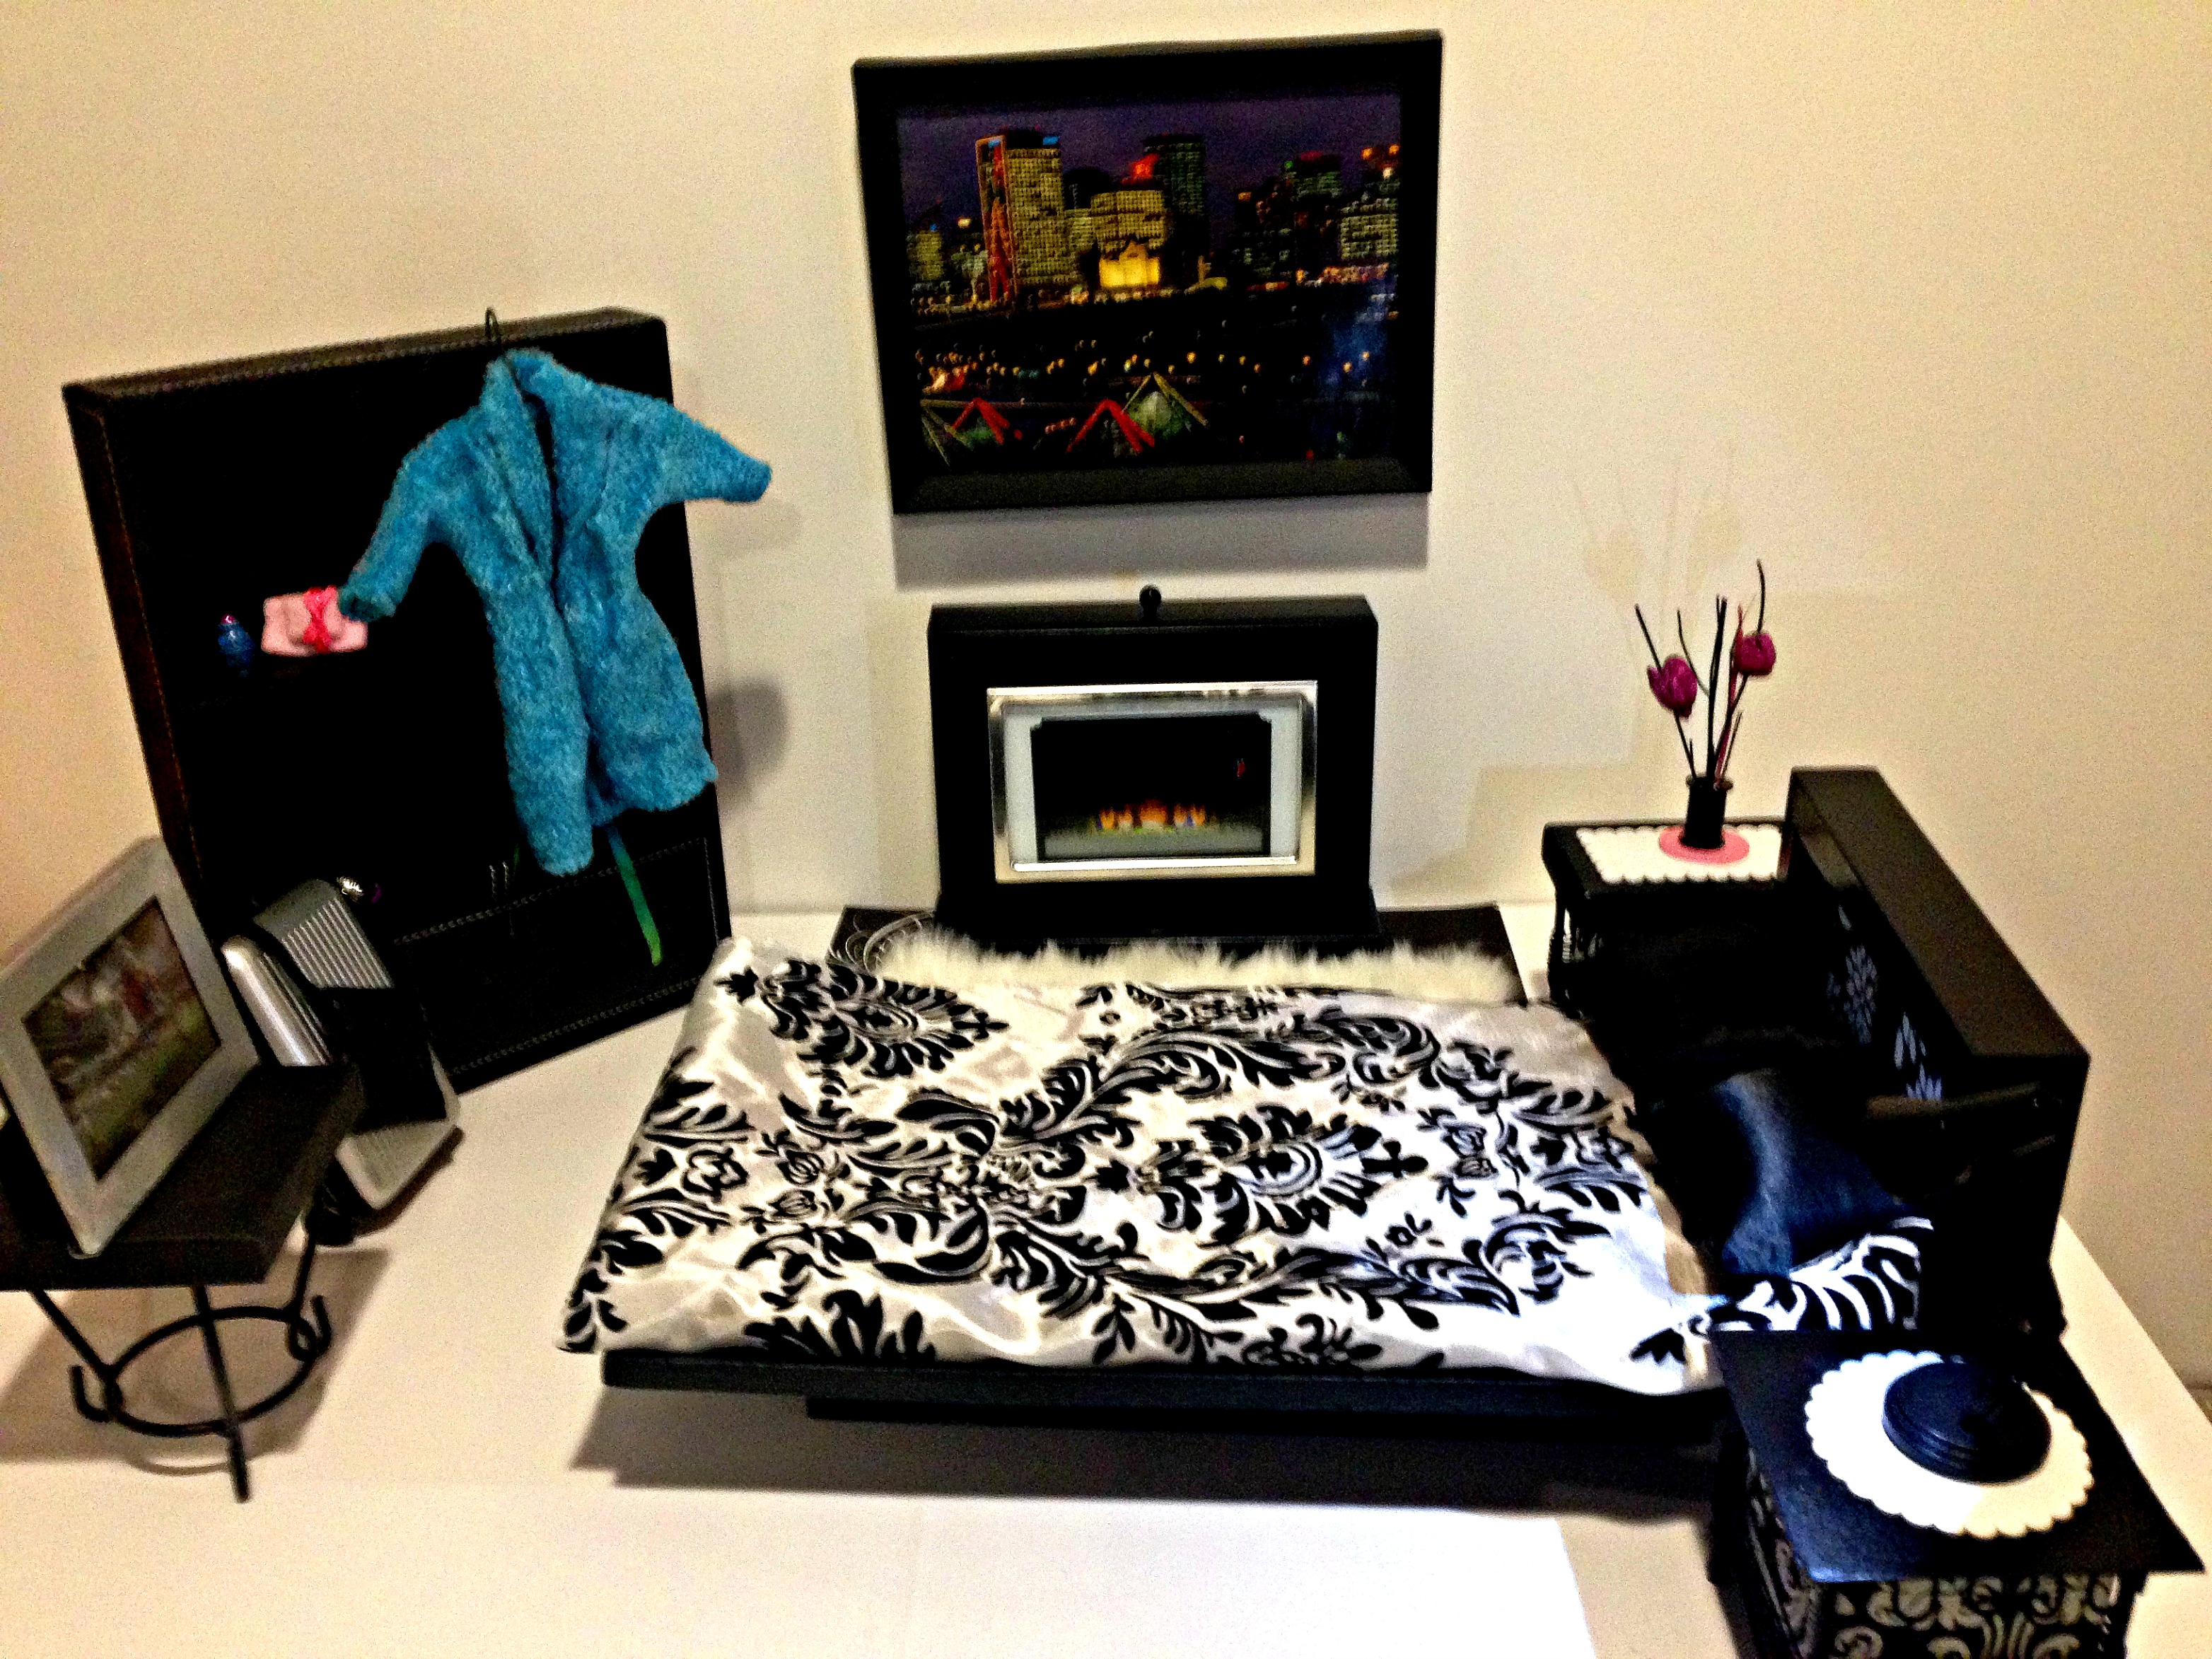
One of my favorite things is turning something old into something new and this luxury Barbie Doll hotel room is no exception – it even comes with a view of downtown Edmonton! Have some fun and take your little Barbie Doll enthusiast out to a garage sales or go through that box of stuff in the basement you were going to drop off at the Thrift Store and see what you can turn it into!

DIY Barbie Doll Hotel Trash to Treasure #barbiedoll #furniture #upcycle #hotel #fireplace #bed #TV #diorama #repurpose #DIY #Thriftstore #trashtotreasure #Starrcreative.ca

Supplies
This project took no time at all and everything is made from bits and pieces collected from the local thrift store. I also used paper and tacky glue.

DIY Barbie Doll Hotel Trash to Treasure #barbiedoll #furniture #upcycle #hotel #fireplace #bed #TV #diorama #repurpose #DIY #Thriftstore #trashtotreasure #Starrcreative.ca

Reversible Fireplace/Fish Tank
This is my favorite piece! This use to be a mini photo album holder. I removed the photo album and was left with a two-sided display cabinet that swivels. I printed off two photo’s, one of a fish tank and one of a fire and glued them to silver stiff paper (like the lid of a Chinese food container) leaving about 3/4″ around the photos. I added glue to the edges and inserted the pictures in to each side.

DIY Barbie Doll Reversible Fireplace and Fishtank DIY Barbie Doll Hotel Trash to Treasure #barbiedoll #furniture #upcycle #hotel #fireplace #bed #TV #diorama #repurpose #DIY #Thriftstore #trashtotreasure #Starrcreative.ca
Mini Photo Album to Barbie Fireplace DIY Barbie Doll Reversible Fireplace and Fishtank DIY Barbie Doll Hotel Trash to Treasure #barbiedoll #furniture #upcycle #hotel #fireplace #bed #TV #diorama #repurpose #DIY #Thriftstore #trashtotreasure #Starrcreative.ca

A Room With A View
This is an old picture I found for a $1.00. It is  Edmonton at Christmas time with the Muttart Conservatory lit up. What a view!

DIY Barbie Hotel DIY Barbie Doll Hotel Trash to Treasure #barbiedoll #furniture #upcycle #hotel #fireplace #bed #TV #diorama #repurpose #DIY #Thriftstore #trashtotreasure #Starrcreative.ca

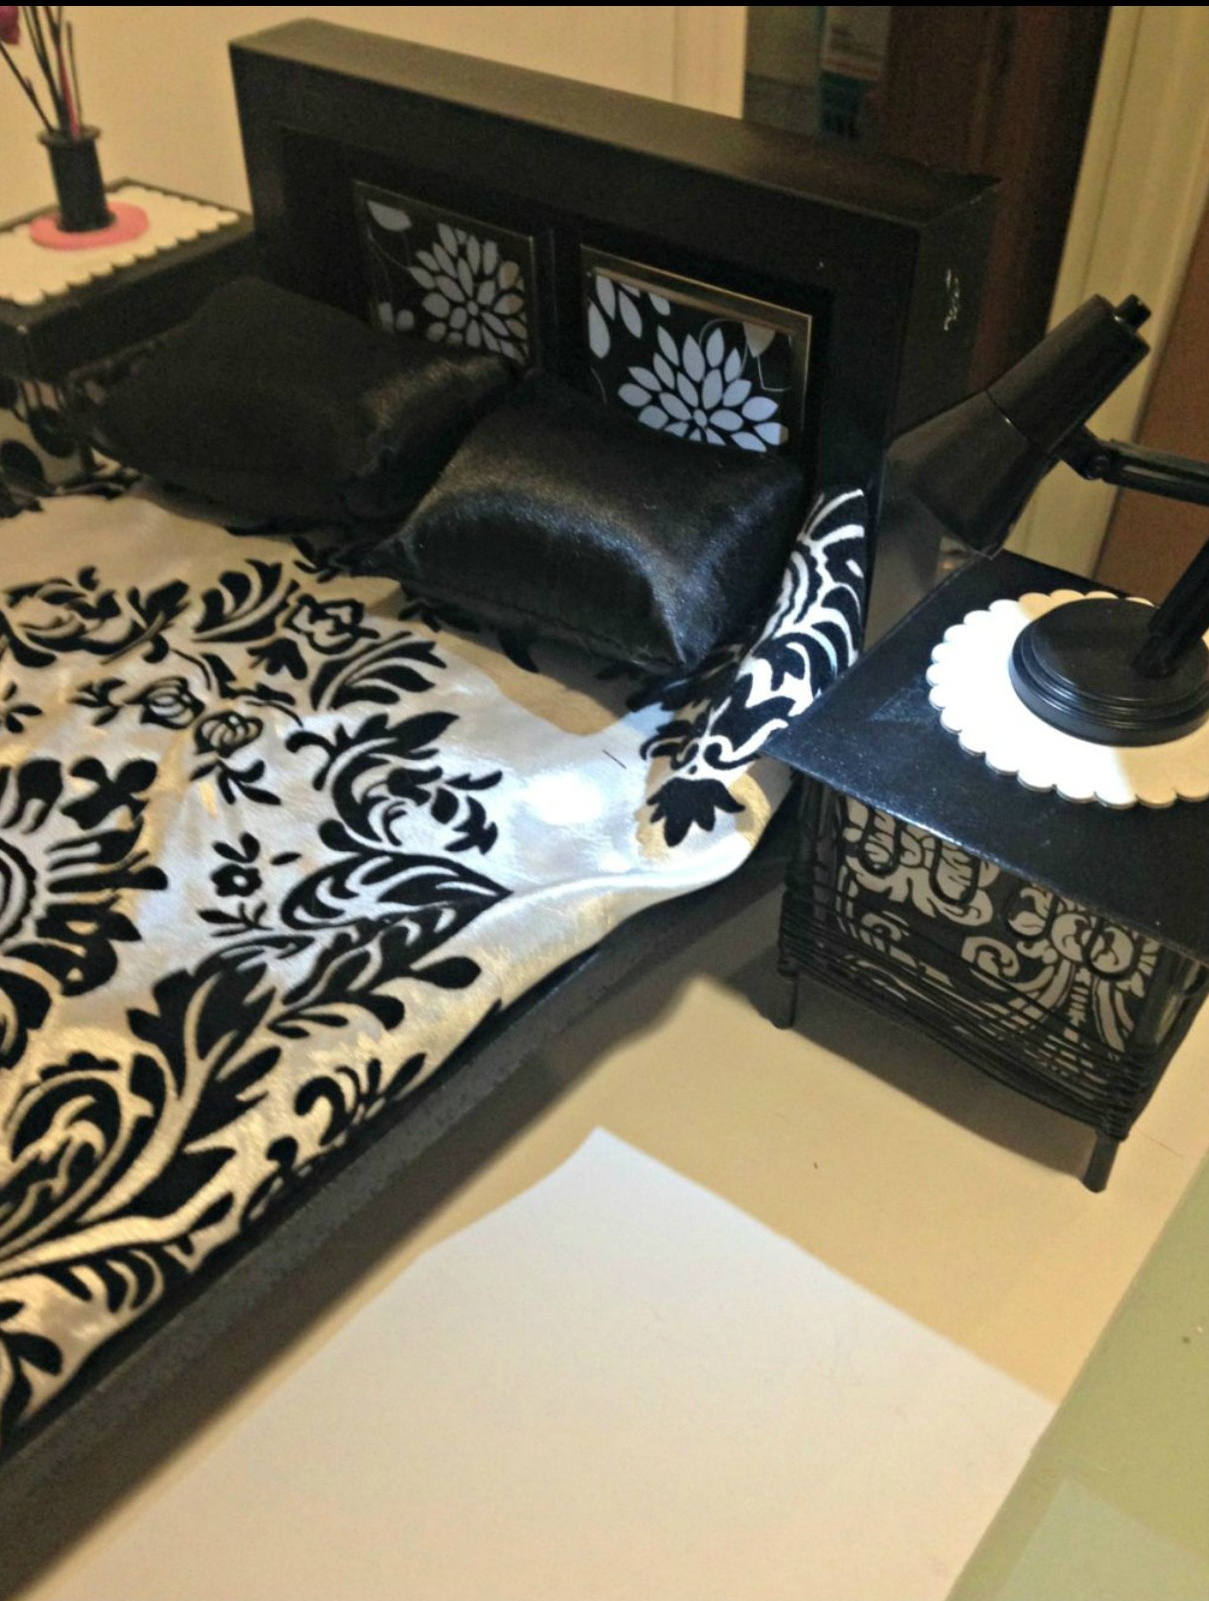
The Bed and Side Tables
I used a black wooden platter as the base (see above) and an old curtain for the duvet cover and pillows. The headboard is a combination of 2 photo albums and paper. The end tables are candle holders with paper insert and black cardboard lids from small jewellery boxes. The lamp I actually found at the dollar store and it works – great find!
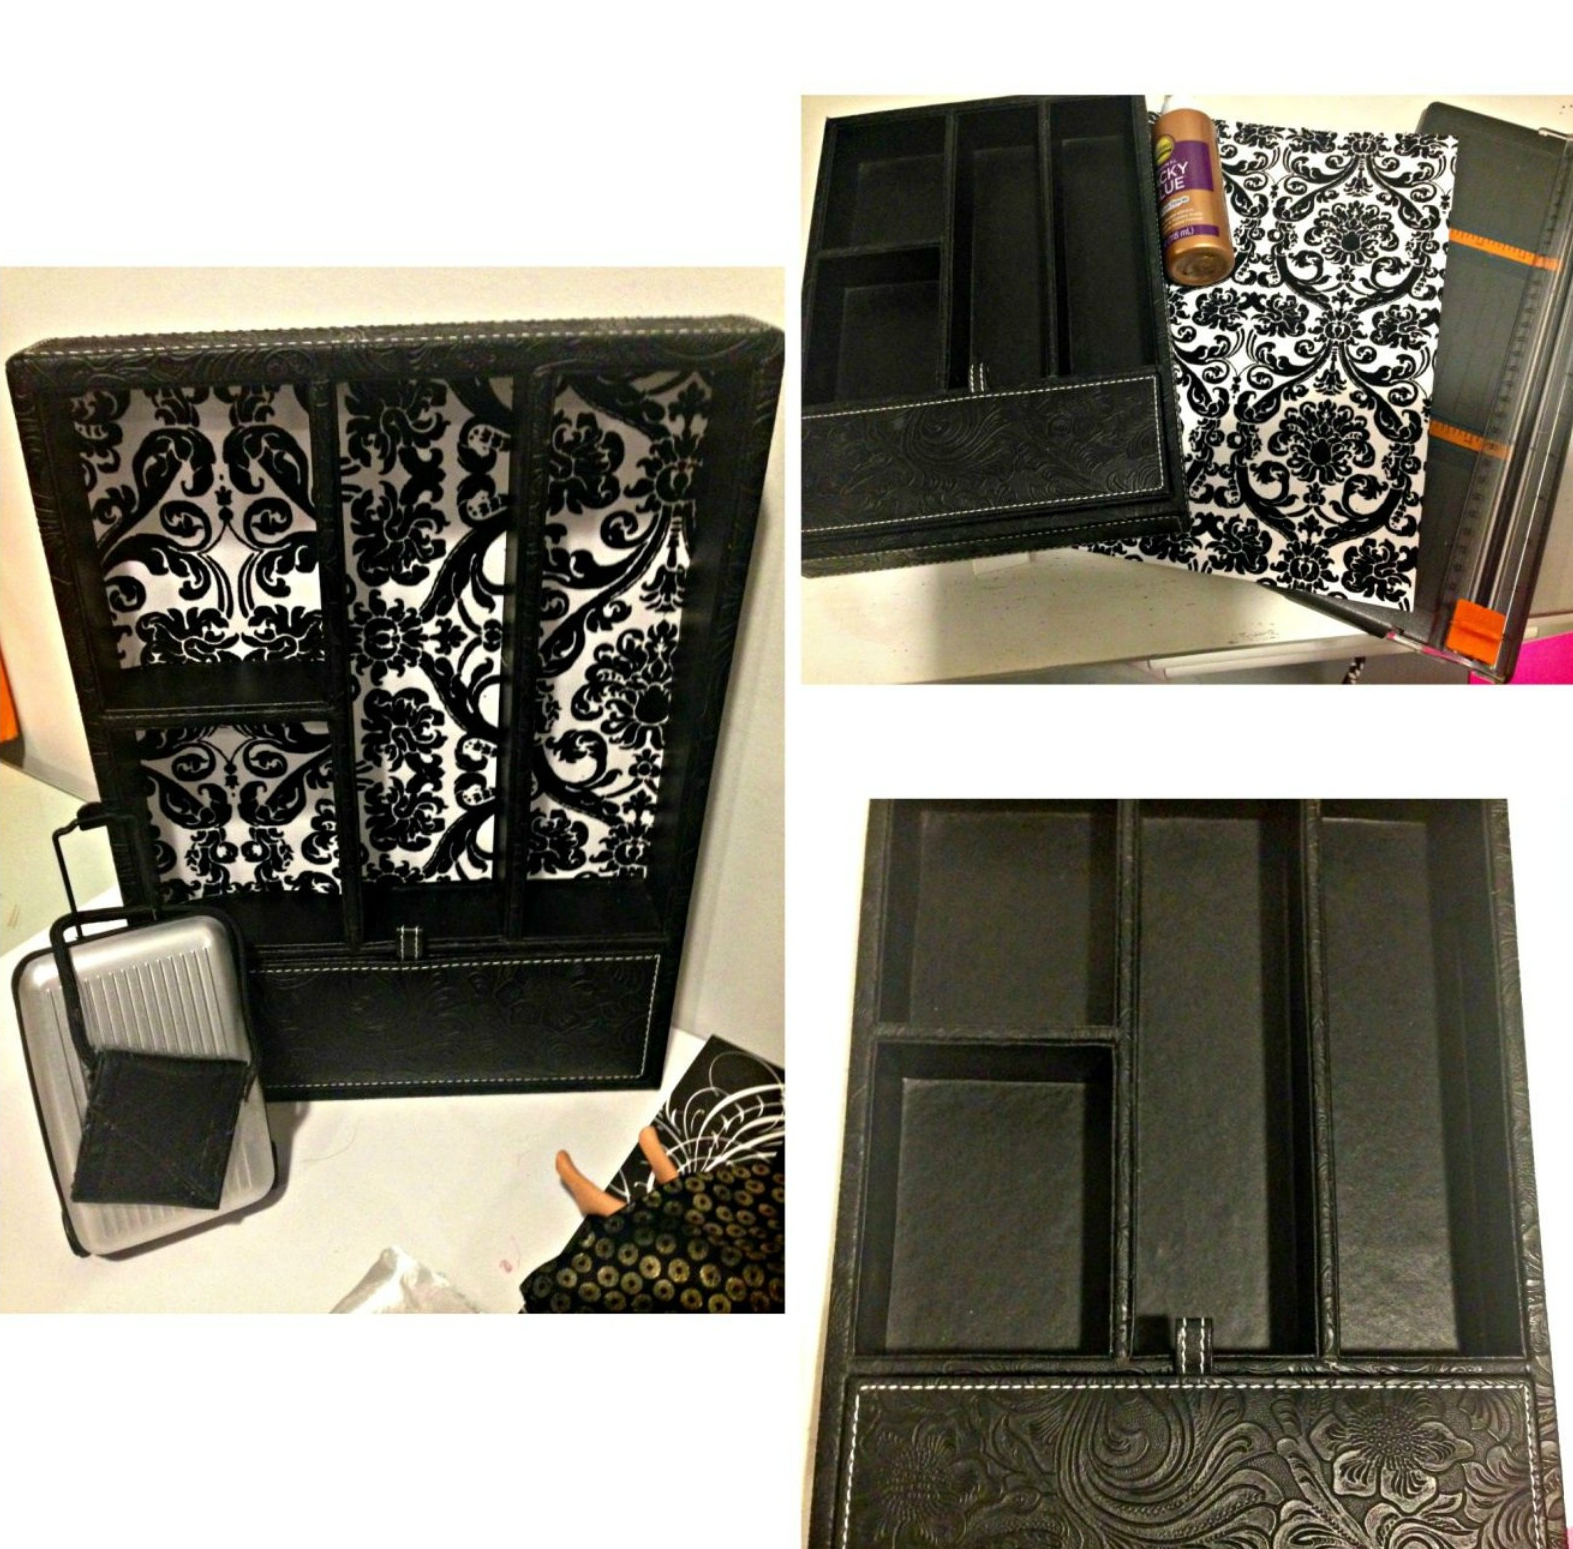
DIY Barbie Hotel DIY Barbie Doll Hotel Trash to Treasure #barbiedoll #furniture #upcycle #hotel #fireplace #bed #TV #diorama #repurpose #DIY #Thriftstore #trashtotreasure #Starrcreative.ca

Cabinet
This was an old jewellery organizer I believe. Whatever it was, it made a perfect shelf or cabinet. All I needed was glue and some paper and it transformed easily into a stunning piece of furniture!

Cabinet DIY Barbie Doll Hotel Trash to Treasure #barbiedoll #furniture #upcycle #hotel #fireplace #bed #TV #diorama #repurpose #DIY #Thriftstore #trashtotreasure #Starrcreative.ca
DIY Barbie Cabinet and Suitcase DIY Barbie Doll Hotel Trash to Treasure #barbiedoll #furniture #upcycle #hotel #fireplace #bed #TV #diorama #repurpose #DIY #Thriftstore #trashtotreasure #Starrcreative.ca

ACCESSORIES

Vase and Flowers
This is a felt pen lid with some little pieces from dried flower arrangement

TV
The TV is a small photo frame with a picture of a soccer game from a magazine – it just doesn’t get any easier then that.

Luggage
This is a credit card holder (see my blog DIY Barbie Luggage) and the laptop bag is a the end of a faux leather belt cut off, folded and glued.

Towels
This is a piece of baby blanket folded into face cloth and small towel.
(See how to make Barbie Bath and Hand Towels)

DIY Barbie Doll Hotel Trash to Treasure #barbiedoll #furniture #upcycle #hotel #fireplace #bed #TV #diorama #repurpose #DIY #Thriftstore #trashtotreasure #Starrcreative.ca

See More Barbie Doll DIY Projects Here

11 thoughts on “DIY Barbie Doll Hotel Room”

  1. Thank you so much!You can send me a link in the comments – I’m excited to take a look. Your posts are always so on point and so meaningful – I’m sure your book will be as well!!!

    Like

  2. Hi! Brilliant post. Loved it!
    I want to send you an Invitation for my new books which have recently been launched as ebook on Kindle/Amazon. Can you pl send me your email ID?

    Like

  3. My daughter is also grown up and I miss the Barbie years too and I miss my 70’s Barbie camper that I spent endless hours playing with. I have lots of Barbie DIY barbie projects on my blog and some new ones to come so tell her to check it out – I love the idea of kids and moms getting creative – adds a whole new spin on playing Barbies! Thanks for your comments.

    Like

  4. This is so cool, I love it. I will have to share this with my cousin who has a granddaughter that would love this. My daughter is all grown up now and I miss those barbie years. I loved my barbie townhouse when I was a little girl. Thanks for sharing.

    Liked by 1 person

Leave a comment

This site uses Akismet to reduce spam. Learn how your comment data is processed.